
Your chainsaw is in need of a new chain, but it’s been so long since you got one that you don’t remember what size you need. Well, you’re in luck, here’s how to measure a chainsaw chain:
To measure a chainsaw chain you need to find the pitch, gauge, and link count. This information can be found on the information stamp on the chainsaw bar, through the numbers on the chain, or through measuring your chain manually.
That’s how you can size a chain in a nutshell, but as you can see, there’s a lot to dig into with this topic. And there are three different ways to get the measurements.
Not to worry, below we’ve got a step by step walkthrough that will help you figure out what size chain you need. Let’s get started!
- Chainsaw Chain Measurements
- Measuring a Chain with the Bar Stamp
- Measuring a Chain with Chain Numbers
- Measuring a Chain Manually
- Buying a New Chain
Chainsaw Chain Measurements
Before we dig into the process, there’s some terms you need to be familiar with.
As mentioned above, there’s three things you need to know to figure out the size of your chainsaw: pitch, gauge, and link count.
But what do those things mean?
Pitch
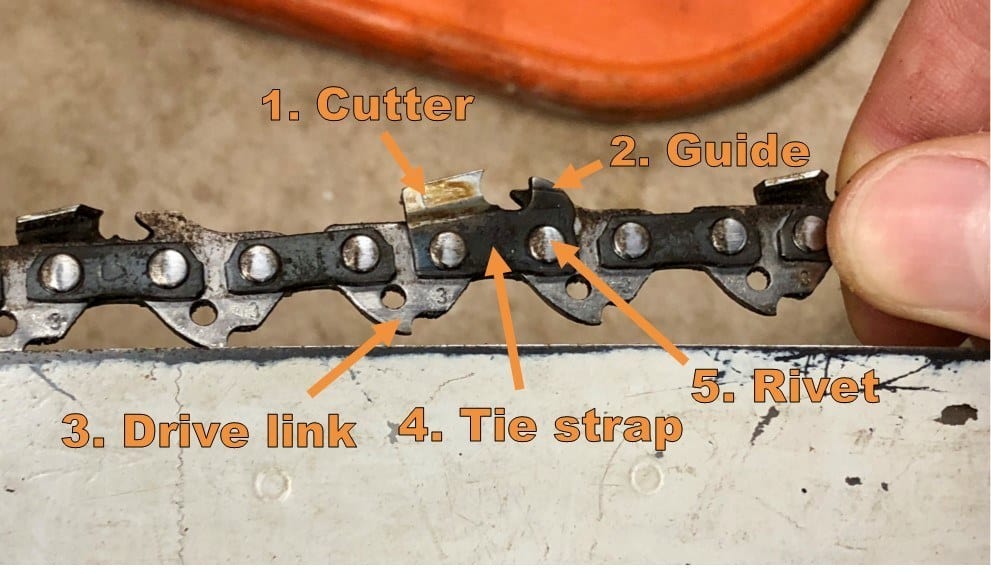
The pitch of a chain is basically the distance between the drive links. In other words, how long each link in your chain is.
Drive links are the shark tooth-shaped pieces on one side of your chain as shown in the image above.
Pitch is an important factor when looking for a chain because it can change the way your saw cuts.
You also need to know this number when you sharpen your chain with a file guide.
Gauge
Gauge describes the width of your chain’s drive links.
Without the proper gauge, your saw will not run properly and could even become a hazard.
If your gauge is too thick, the chain won’t run through the bar track smoothly. This could overheat your engine and ruin your saw. Or if the gauge is WAY too thick, then you won’t even be able to fit your chain onto the chainsaw’s bar track at all. Which would make it unusable.
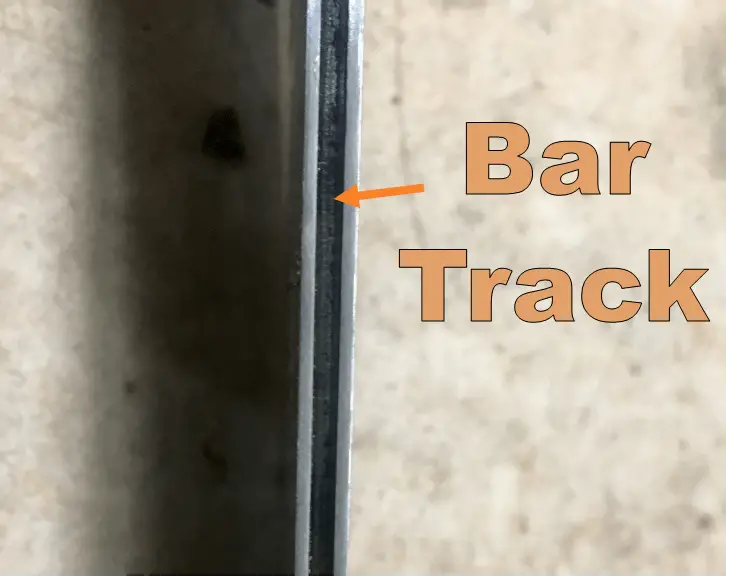
On the other hand, if your gauge is too thin, the chain could slip out of the bar track which can be extremely dangerous when operating a saw.
Link Count
As the name suggests, link count describes the number of drive links in your chain.
This number is important for getting the correct length of chain for your particular chainsaw bar.
If your chain is too short, you may not even be able to install it, and if you can, it will be too tight.
If it’s too long, you won’t be able to tension your chain properly which could cause your chain to slip out of the bar track which is a bad day for everybody.
Now that you know the right vocabulary, let’s dig into how to measure a chainsaw chain.
Measuring a Chain with the Bar Stamp
This is by far the easiest way to find the correct size chain for your chainsaw bar.
All you have to do is find the information stamp on your chainsaw bar and read the information off of it. Easy, right?
Here’s what to look for on the stamp:
Pitch
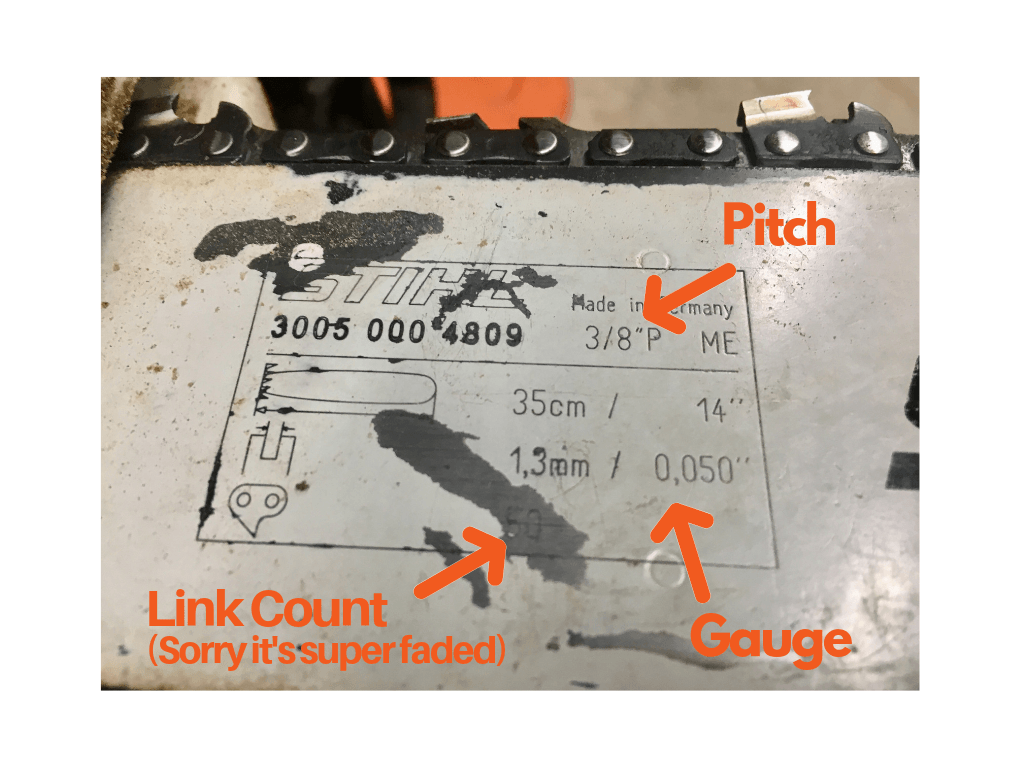
Pitch is normally indicated by a capital “P” as is the case with our picture above. However, sometimes the chain will have the pitch listed as a decimal instead of a fraction.
The only time this will be a problem is if you’re buying a chain and the pitch measurement is listed differently than what you have. But this can be easily fixed, just convert one of them to a decimal so they match.
For example, if the pitch you have is 3/8″ but the box says 0.375″, convert your fraction to a decimal by dividing the top from the bottom. 3 divided by 8 is 0.375 so your chain matches.
You can also do the reverse if your chain is in decimals but the chain box is in fractions. Convert the number on the box to a decimal to see if they match.
Who knew you’d be breaking out algebra to measure your chain?
Gauge
The gauge is indicated by the symbol of a bar track. If you look to the left of the number labeled “gauge” in the image above, you’ll see what I mean.
Gauge can be given in both millimeters and inches but most chainsaw chain boxes have inches listed on them.
There are only four possible chain gauges. They are: 0.043″, 0.050″, 0.058″ and 0.063″.
Smaller gauges are usually more common than the larger sizes.
Link Count
Lastly, the link count is indicated by the symbol of a drive link.
As I mentioned before, this number dictates how long or short your chain will be. Without the correct link count, your chain won’t fit your bar.
On your bar, the link count is indicated by the picture of a drive link. In the photo above, the link count is 50.
That’s all there is to it for getting information off a chainsaw bar. I would recommend taking a picture of the information stamp if you go to buy a new chain.
If you’ve got all the information you need, skip down to our section about buying a new chain to see how these numbers relate to chain boxes.
While this is the easiest way to get your chainsaw chain size, it’s not always the most feasible.
As you can see from our picture, the bar chain can get pretty faded. If your bar is too faded to read the numbers, don’t worry, there are other ways to get the infromation you need.
Measuring a Chain with Chain Numbers
If your bar is too worn out to see the information stamp or you just have access to your old chain, you can still get the numbers you need.
Chainsaw chain brands stamp numbers and/or letters into their chains that can give you the measurements of your chain when combined with a table.
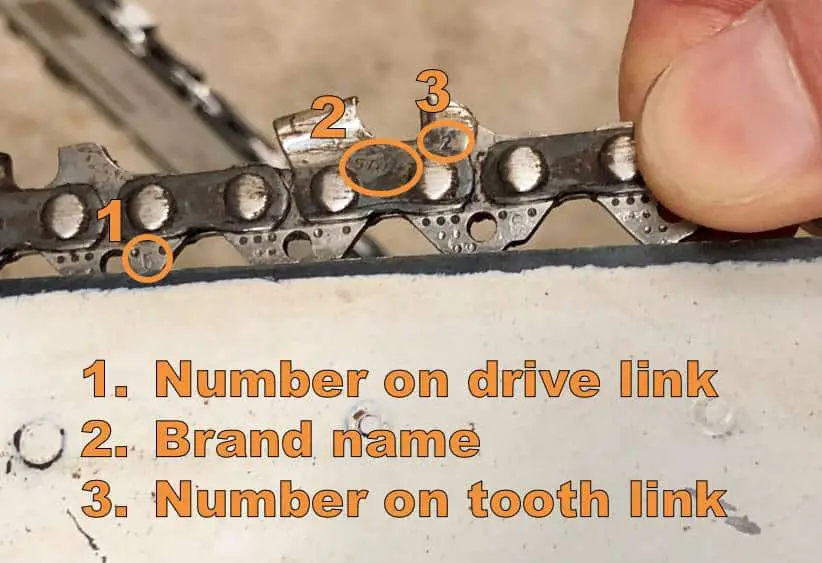
The popular chainsaw chain brands of Carlton, Husqvarna, and Oregon stamp their brand and a number letter combination onto their chains.
Stihl uses a slightly different method as you can see above. They stamp their brand and a number on both the drive link and the tooth link.
We have the size charts for these four brands right here (note: the page this links to also has further instructions on how to match the numbers).
These numbers will give you the pitch and gauge of the chain but they will not give you the link count.
That’s easy enough to solve though, just count your old chain’s links!
If you just need your link count to get your last numbers, jump down to our section on manually counting links to get started.
Measuring a Chain Manually
If you’ve tried all of the other ways to measure a chain and you still don’t have the informaion you need, then this is the last step.
Measuring chains manually can be a little complicated, but we’ve got it broken down so you can easily follow along.
Buckle your seatbelts, it’s time to measure stuff.
Pitch
Pitch is arguably one of the more difficult things to measure. So let’s get technical.
Pitch is the distance between three rivets divided by two.
Here’s how you get that number.
1. Remove the Chain
You’ll need to do this for each step of measuring your chain manually.
And you’ll have to remove it eventually to replace your old chain, so might as well do it now.
Do this by removing the front panel, and then removing your chainsaw bar. The chain will slide right off.
2. Choose Three Rivets
As I stated earlier, pitch is the distance between three rivets divided by two.
In order to get this number, straighten out your chain and pick three rivets in succession to measure. It’ll look something like this.

I marked the rivets I’m going to measure between. Try to get the chain links as straight as possible to get the most accurate reading.
3. Measure the Rivets
This is the most important step: measure the distance between your three rivets.
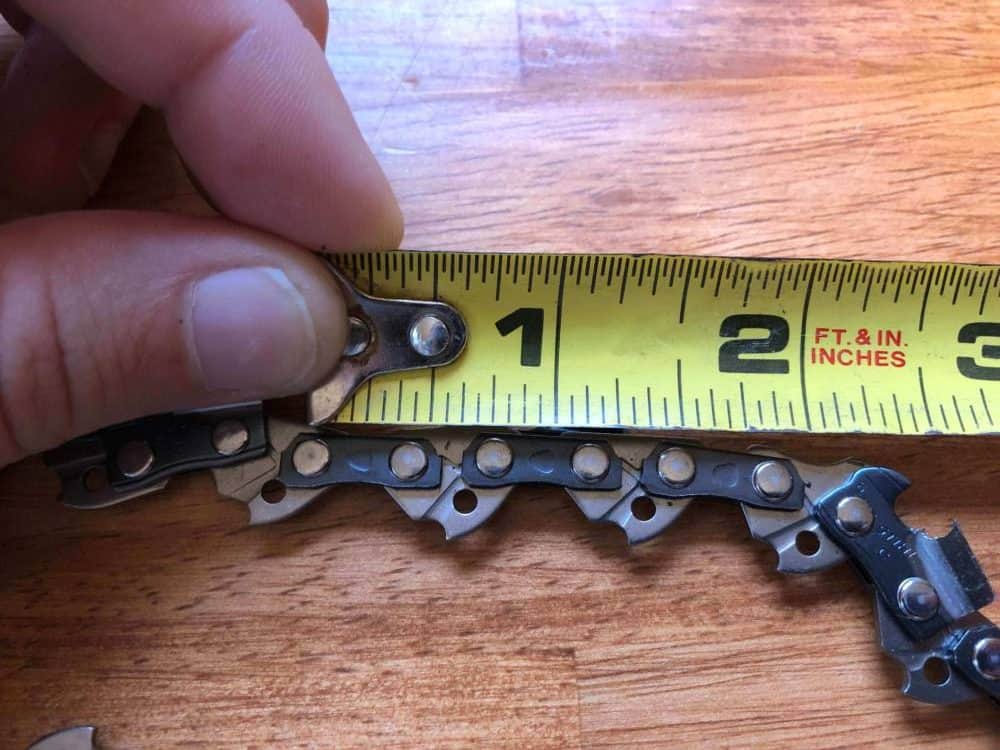
For this chain, I got 3/4″ but remember we have to divide that by two.
So, I’m going to switch that to 6/8″ so I can divide the numerator by two (yay, more algebra).
This gives me a pitch of 3/8″.
Last thing to mention here, some chain boxes will have this number as a decimal instead of a fraction. That’s pretty easy to change.
Simply take your fraction (3/8) and divide the top by the bottom (you can use a calculator for this part). 3 divided by 8 gives me a decimal of 0.375″.
Boom, done. Well, with pitch at least. Next you have to measure the gauge.
Gauge
Getting gauge is a little tricky. Measuring this accurately with a tape measure is nearly impossible.
But, luckily there are only 4 possible gauge measurements. They are 0.043, 0.050, 0.058, and 0.063. That helps us out a little bit, but it’s still not the easiest.
There’s two ways you can do this. If you happen to have a pair of vernier calipers, use those to measure the bar groove on your chainsaw bar. This will give you the most accurate measurement for your gauge.
But, if you’re like most people, you probably don’t have fancy calipers laying around. So, here’s a trick for finding the four gauge sizes.
Make sure the bar groove on your chainsaw is clean. Then, grab a quarter, a penny, and a dime.
Slide each one into your bar groove until you find one that fits snugly but doesn’t have to be forced into the groove.
The sizes break down like this:
Quarter = 0.063″
Penny = 0.058″
Dime = 0.050″
If none of them fit without having to be forced, then your gauge is 0.043″.
This is a quick and dirty way to find the gauge that you need.
The last thing you need, and luckily the easiest, is to find your link count.
Link Count
Link count is the easiest thing to measure manually. You just lay out your chain and count the drive links.
You can either lay it out so the links are parallel with one another and count them in pairs like this:
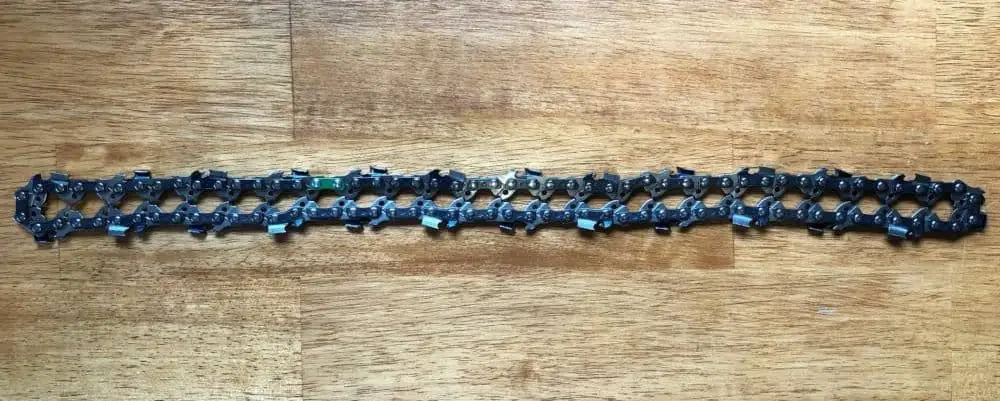
Or you can count them one by one. Most chains have a link that’s a different color. See the green link in the picture? This link makes an excellent starting point.
This chain has a link count of 50.
Now that you’ve got all your measurements, let’s figure out how you use this information to get the correct new chain.
Buying a New Chain
All this information is fine and good, but how does that help you buy a new chain?
Let’s use an example to walk through how to match up the measurements you’ve just identified, with the information on a new chain’s box.
For this example, I’m going to use the measurements of the chain that I measured manually above.
This gives me a pitch of 3/8″, a gauge of 0.050″ and a link count of 50. Now let’s look at our first chain box.
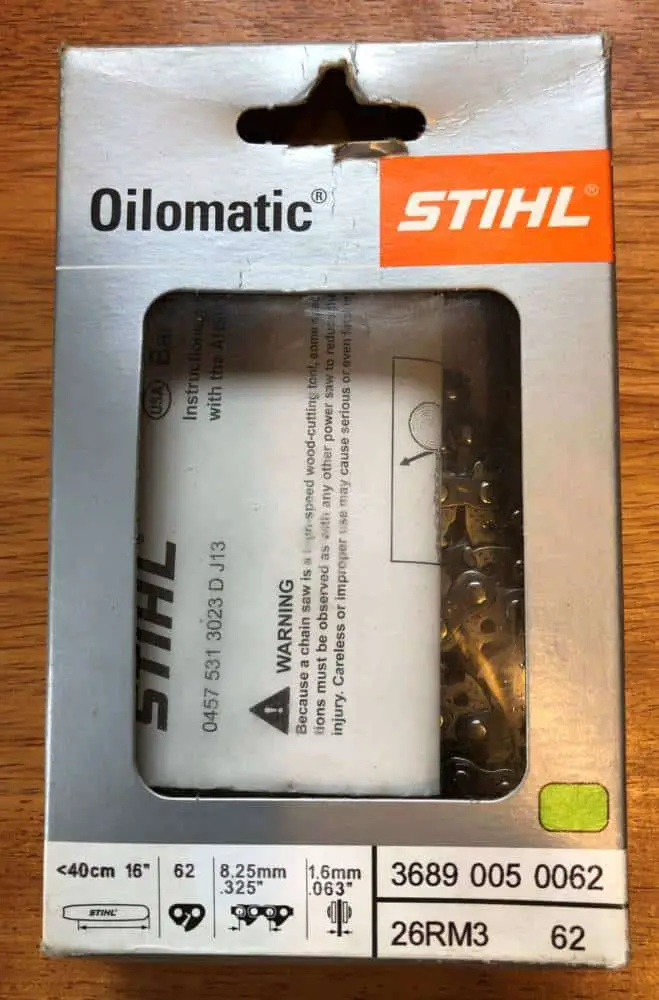
The measurements we need are on the bottom-left of the box. Going from left to right let’s talk about the symbols real quick.
First, you have the chainsaw bar length, then the link count, then the pitch, and last you have the gauge.
Looking at those numbers, you can already tell that this chain doesn’t fit, but let’s go through each one.
First, you can skip the bar length, we don’t need it because it’s essentially communicating the same information as the link count.
You can tell that this chain has a link count of 62 which doesn’t match the 50 I need.
Next, it has a pitch of 0.325″. But, I have a fraction not a decimal, so let’s start by converting it.
All you have to do is take your fraction (3/8) and divide the top by the bottom. 3 divided by 8 gives me a decimal of 0.375″. So again, this chain doesn’t match.
Lastly, the gauge. The chain box has a gauge of 0.063″ which does not match the gauge I need.
Pretty straight forward right?
Let’s do one more example just to make sure you get it.
Here’s my next box:
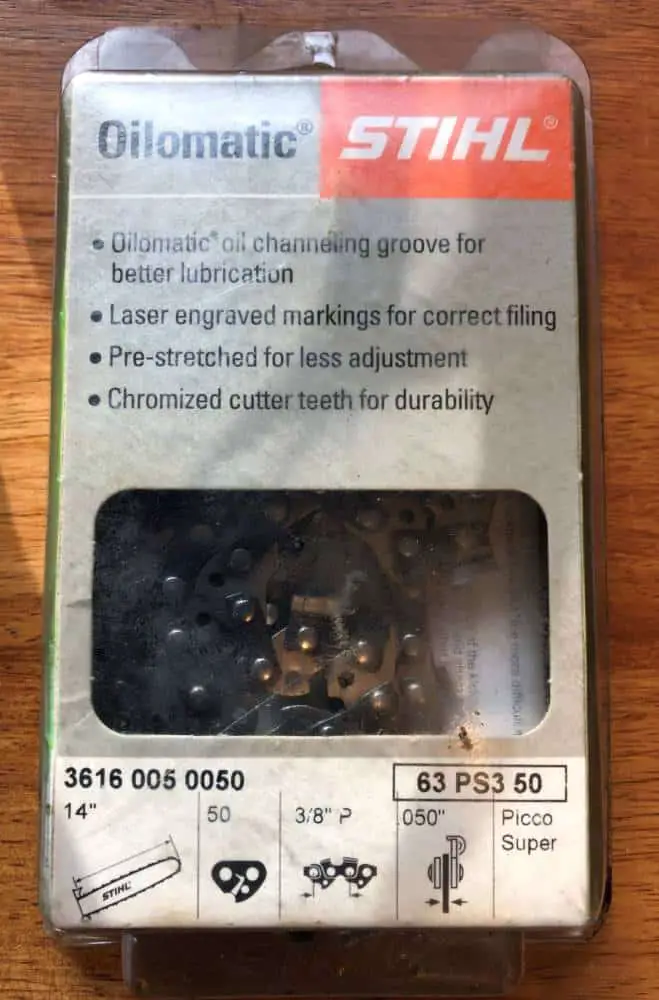
This one’s looking promising!
It has a link count of 50, a pitch of 3/8″, and a gauge of 0.050″. This chain matches the sizes I need perfectly.
Now that you have the size you need, you just need to replace your chain. Since new chains come sharpened, you’re ready to get out and get stuff done.
Wrap-Up
Having the correct size chain for your saw is crucial. We’ve given you three ways to find the size of your chain. From the information stamp on the bar, the markings on your chain, or to measure it manually.
Depending on the condition of your bar or chain, you may even have to use a combination of these methods.
You’ve got everything you need to tackle a new project, so what’re you waiting for? Go do it!