The log cabin fire lay is one of the most popular and most effective methods for building a fire. The bad news is, I’ve seen a ton of log cabin fires built, and there’s some really poor technique out there.
So, how do you build a log cabin fire the right way? And when should you use it instead of other types of fire structure?
Here’s the good news, if you know a few basic things about log cabin fires, the whole process is actually pretty straightforward.
And by the end of this post, you’ll have all of the info you need to get a log cabin fire roaring. Let’s start by covering when you should use a log cabin fire vs. other methods.
When to Build a Log Cabin Fire
1. For Cooking over a Campfire
The log cabin fire lay is THE best approach for cooking over an open fire.
The square layout of the log cabin fire makes it much leveler than other structures, like a teepee, or lean-to.
Just imagine trying to set your pot/pan on top of a teepee fire, it would topple into the flames! And we can’t have that, eating is too much fun.
Even if you wait for the fire to burn down to embers before cooking, the log cabin structure still works a bit better because it tends to burn more evenly.
2. For Starting a Fire in a Fireplace
The log cabin fire lay is also a good choice for starting a fire inside of a fireplace, because it doesn’t require the same level of balance that it would take to do the initial build of a teepee fire on the stone or metal surface.
Another thing to consider, is that the log cabin structure burns more slowly than a teepee or lean-to fire, which is good if your goal is heat output.
However, you may not be able to use the log cabin structure inside of a wood stove, depending on the size of your stove and the length of your firewood. It might work, but you’ll just have to check the space available.
If your wood stove is too small for a full log cabin structure, I usually use a lean-to structure as my back-up plan, because it’s essentially a “half log cabin”.
Alright, now that you know the best times to use the log cabin method, let’s walk through the step-by-step process for building one the right way.
How to Build a Log Cabin Fire
1. Find a Safe Area to Build the Fire
For any type of fire, your first step is to make sure you’re starting it in a safe and contained location.
I’m using a fire pit in this example, but a fireplace, wood stove, or fire circle all work great.
If you’re camping in the backcountry, or if you just don’t have an established fire circle, you can build your own pretty easily. For example, you could dig out a shallow dirt hole and line the outside with rocks.
There are several different approaches for this, but the main priority is to keep flames and sparks contained.
2. Gather Materials
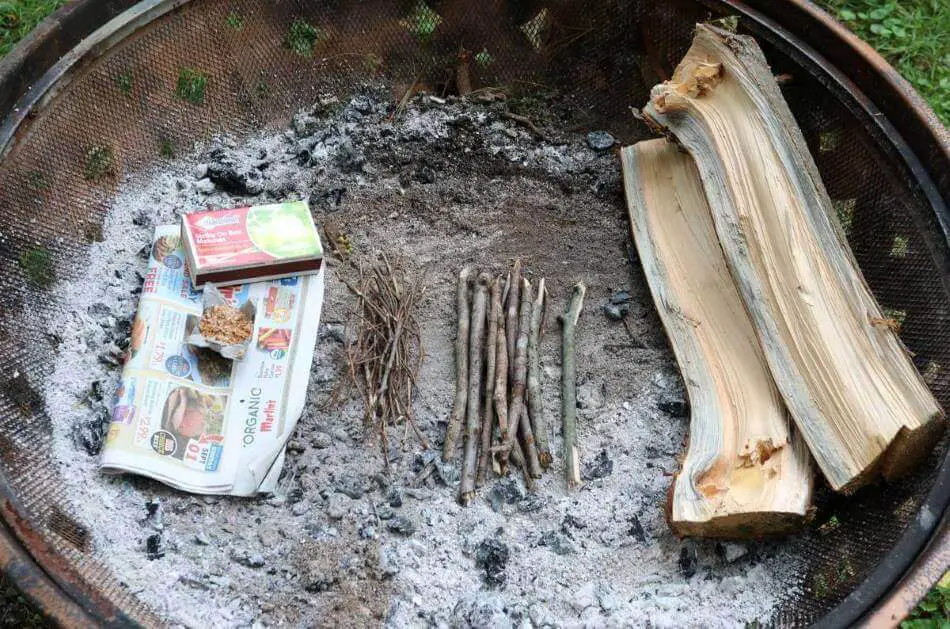
Next, you need to gather your materials. In the photo above we have the following, from left to right:
- Matches and fire-starters
- Tinder
- Kindling
- Firewood
These are the 4 main things you’ll need for starting any type of fire. So if you don’t have them yet, go get them!
As a note, tinder would be paper, wood shavings, or other natural fire starters. I would also include very small sticks (the smallest you can possibly find) in the category of tinder.
Kindling, on the other hand, is mid-size sticks or small pieces of firewood. I haven’t done it for this example, but a common approach for kindling is to split firewood pieces into smaller kindling chunks with a hatchet.
Lastly, firewood is your fuelwood, and that’s what will keep your fire going after the initial starting phase.
Don’t worry too much about these terms (e.g. tinder, kindling, fuelwood), the most important thing is that you have a variety of sizes so that you can build a fire that will grow.
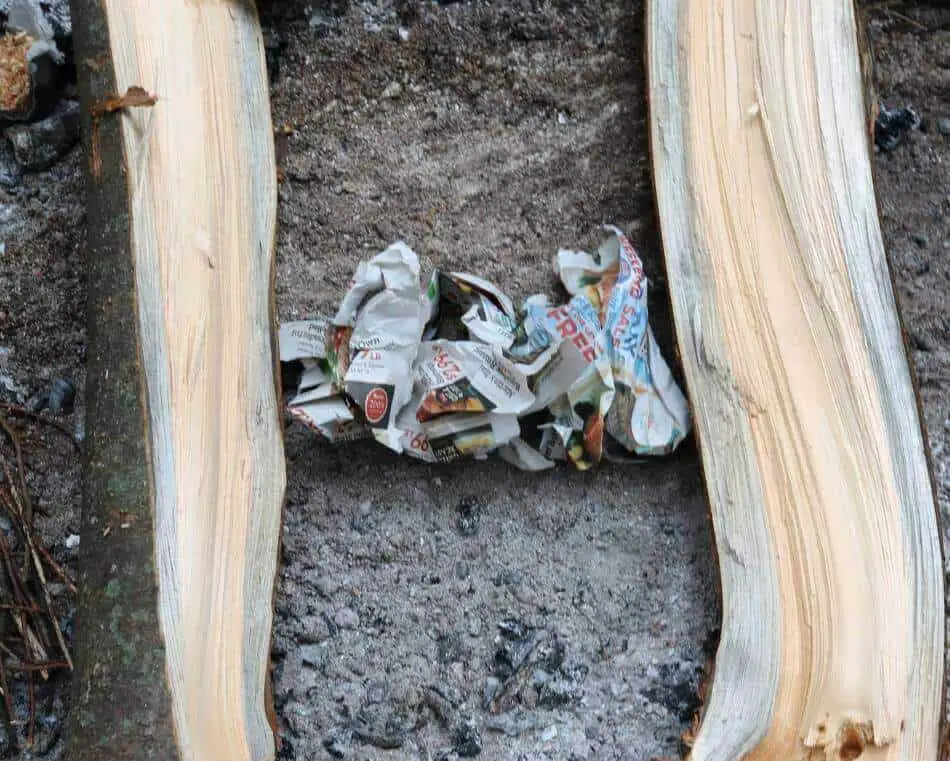
3. Arrange 2 Base Logs + Fire Starter
Now for the building phase.
First, take two pieces of firewood and arrange them parallel to each other in your fire area.
Then place your firestarter, or paper, or other tinder directly in the middle of this wood.
4. Add Tinder on Top
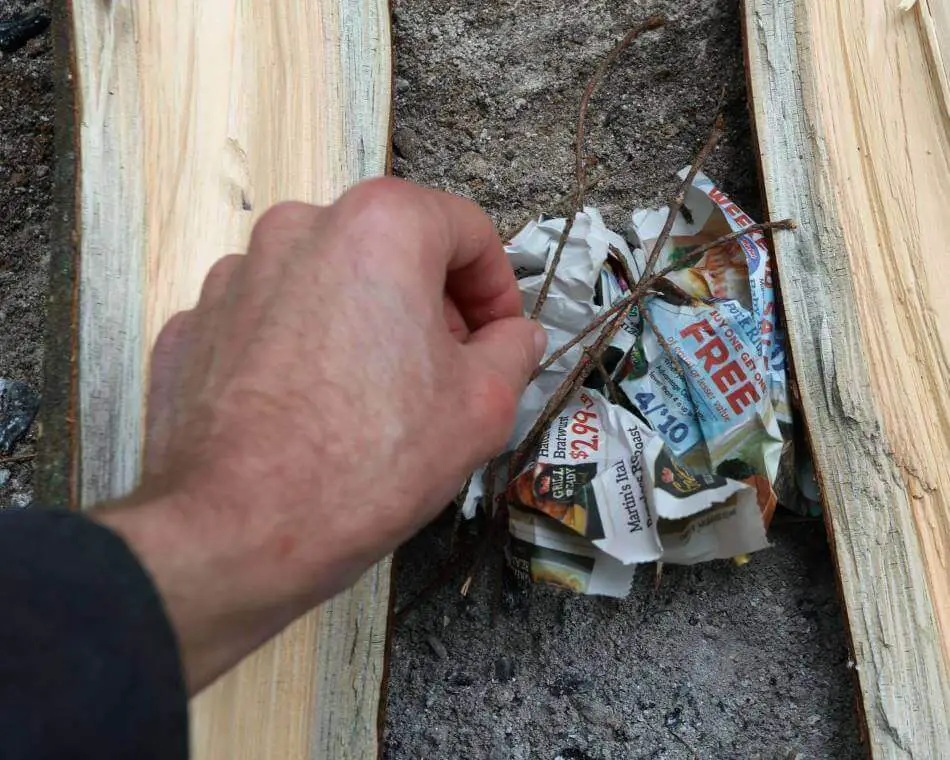
Okay, technically I’m using two different types of tinder here: the paper that we added in the last step, and now the tiny twigs.
And I’m placing the twigs on top of the paper, because fire burns upwards. The sticks are denser than the paper and will burn longer once they catch.
You’ll notice through all these steps, that we are essentially arranging the materials to act as a “domino-effect” that will progressively catch larger and larger pieces of wood on fire.
5. Add Kindling Across Base Wood

Next up, we’re going to create a small “roof” over our tinder, with our larger pieces of kindling.
It’s important NOT to put kindling so close together that it’s blocking out airflow. One of the most important factors for starting a new fire is to get good airflow because the flames need oxygen to burn.
As you can see in the photo, I’m leaving a bit of space between each new piece of wood. This is a small thing, that makes a big difference.
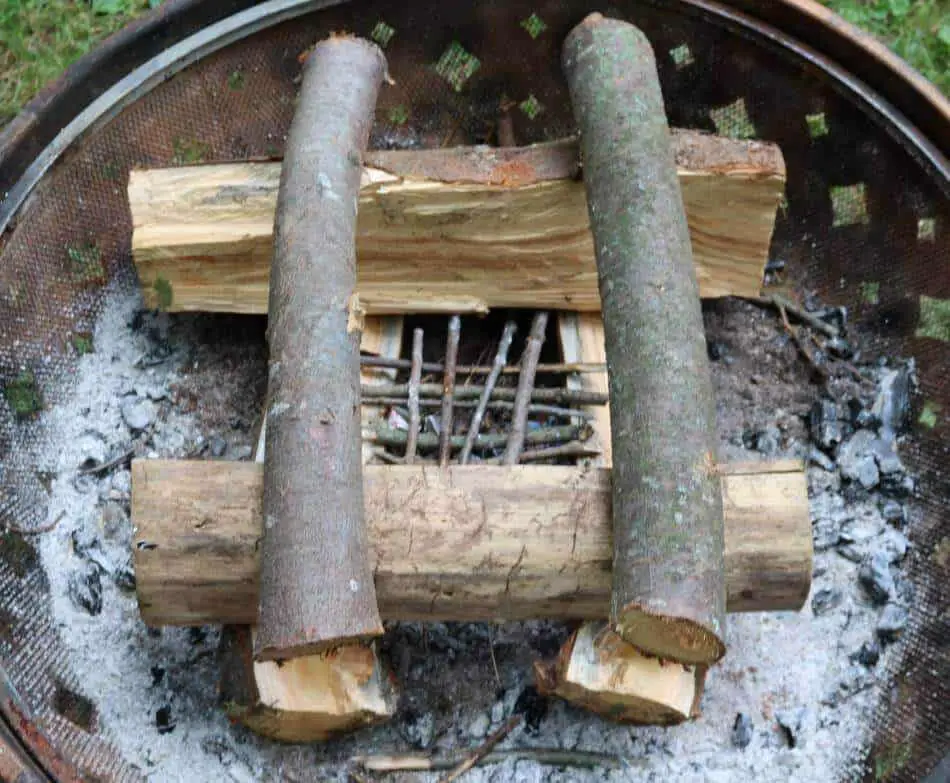
6. Add More Fuel Wood
In this step, we make our fire structure actually look like a log cabin.
As you can see in the photo above, I’ve added two new pieces of firewood across my original two pieces on the bottom.
Then, I’ve added an additional two pieces of firewood on the top. You don’t need exactly 3 layers for your log cabin fire. You should do at least two, but you could also go as high as 4 or 5.
Another thing you could add, which I have not done in the photo, is you could add additional cross pieces on the 3rd layer.
I wouldn’t do that on the second layer, because it would cover your kindling, but if you have the cross pieces on the 3rd level it can work well because it will gradually catch those extra pieces on fire as it grows.
Having the additional cross-pieces can also be helpful if you plan to cook over the open flame. You may even be able to find some dense flat logs to put on top, which would be even easier to cook over.
7. Light it!
The last step is to light your log cabin fire. If you’ve done a good job, just one match should do the job. The true mark of a skilled fire builder is the ability to consistently light a fire with only one match 🙂
Since fire burns upwards, the best way to light a log cabin fire, is NOT from the top. Instead, it’s better to go from the bottom, reaching your hand in between the two pieces of firewood on the very bottom.
If you prefer a lighter, that will also work, as long as you can reach it far enough underneath the log cabin to light your fire, without burning yourself (please don’t burn yourself).
And with that, you should have everything you need to know to start a beautiful, blazing, log cabin fire.
Related Questions
What is a Fire Lay?
A fire lay is the structure used to build a fire before igniting it. For example, some of the most popular types of fire lay are teepee, lean-to, and log cabin. The fire lay used will have a significant influence on the way a fire burns and how it can be used.
What is the Easiest Way to Start a Fire?
The easiest way to start a fire is by using the teepee fire lay. The teepee structure is the first method of fire starting learned by most beginners, and the airflow and orientation of the wood allow a flame at the bottom to naturally burn upward, making it easy to light and sustain.