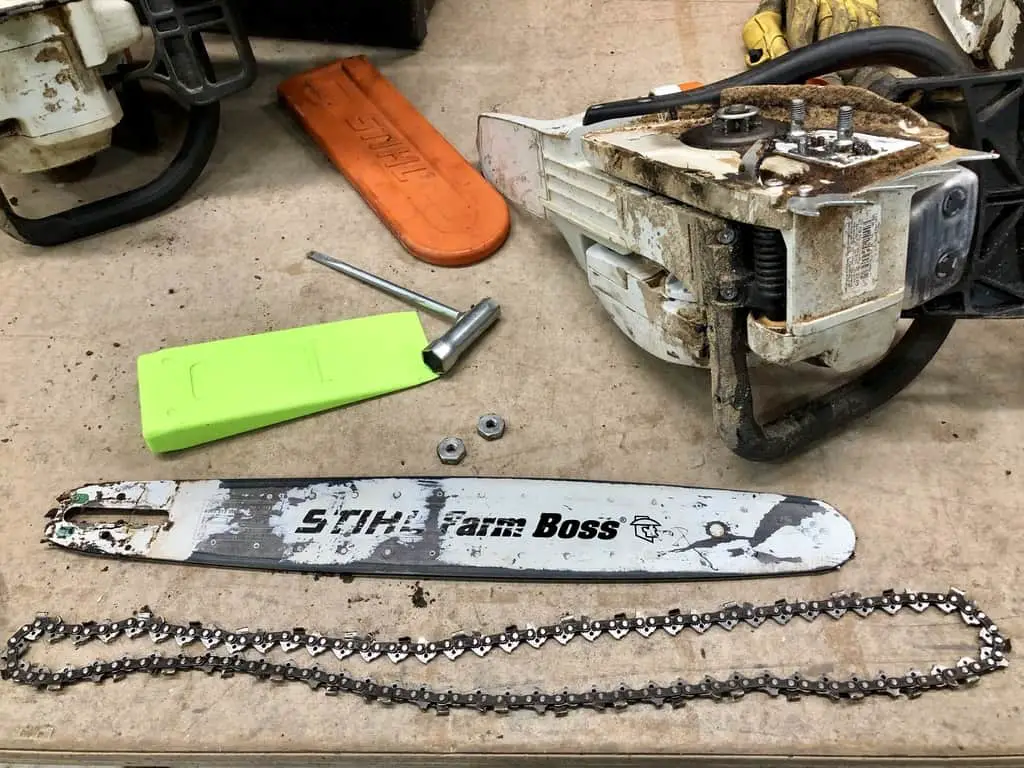
Chainsaws have a lot of moving parts, and it can be tough to figure out how to replace a chainsaw chain and put it back on correctly.
But don’t worry, we’ve got you covered. This post will take you through each step you’ll need to successfully change your chainsaw chain.
If you only need help with one step, click the relevant link below to jump right to it. Let’s get started!
- Get a new chain
- Grab a scrench and a gauge tool
- Remove the front panel
- Pull the bar off
- Remove the old chain
- Inspect and clean the bar
- Clean around the sprocket
- Re-assemble the bar and chain
- Screw the panel back on
- Tighten the chain
- Test chain tension
I totally realize that these one-liners aren’t going to give you enough information to get the job done. Let’s jump-into the detailed guide, where photos and detailed descriptions will fill-in the gaps.
How to Replace a Chainsaw Chain
After you’ve found a chain of the appropriate size and style, you’ll also want to know how to install it.
This can be intimidating if you haven’t done it before, but it’s really pretty simple.
Believe it or not, gas-powered chainsaws have been around for nearly 100 years. Although they’ve gotten much better over the years, the technology is still not difficult to understand.
As you learn the basic components of a chainsaw, operating and maintaining them will become second nature for you.
Sorry for the history tangent – Let’s get started!
1. Get a New Chain
You’ve got a couple options for finding the right chain. First, you can get an exact replica of your current chain. In other words, if you still have the old chain you can just buy a new version of that same chain, as long as the manufacturer is still making them.
If you want something different, or if you blew your previous chain into tiny bits, it’s important that you buy a chain that is compatible with your chainsaw and it’s guide bar.
There are 3 numbers to look for, in order to buy a chain that is compatible with your chainsaw bar. They are as follows:
- Link count
- Gauge
- Pitch
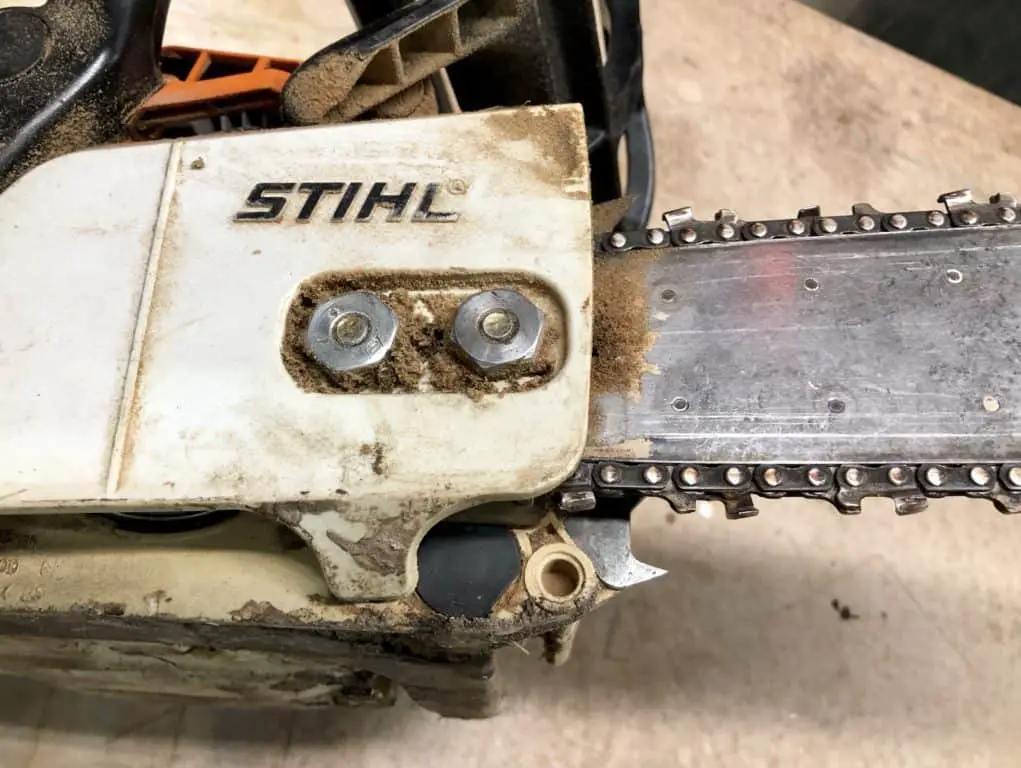
Here’s where you can find them stamped into your chainsaw:

There’s also two other ways to get the measurements of your chain, just in case your bar is well loved like ours. Check them out here.
2. Grab a scrench and a gauge tool
In addition to a new chain, you’ll also need a scrench and a gauge tool in order to perform this process. A scrench is used to open the chainsaw’s casing, and also to loosen/tighten the chain.
Side note: it’s called a scrench because it’s a screwdriver and a wrench combined. “Sc + rench”. This is a multi-tool that is used for a variety of chainsaw maintenance jobs. You can find a picture of one in step 3 below.
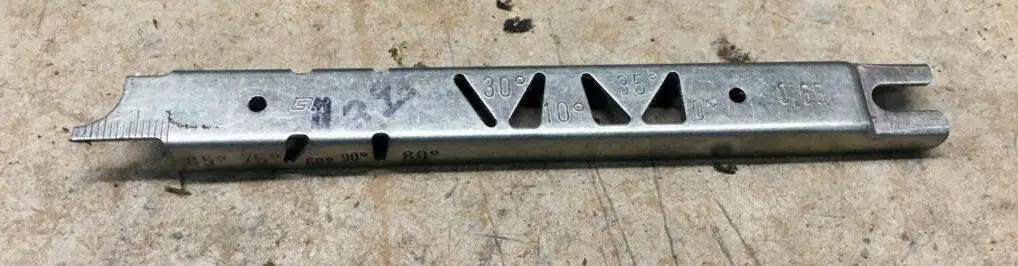
The gauge tool will help you clean and maintain your chainsaw bar. Here’s a photo of one:
If you don’t already have these tools, you’re gonna want to get them before you attempt to change your chain.
Pretty much any store that carries chainsaws will have these, and they’re both pretty cheap. You can also buy them online.
3. Remove the front panel
Now that you have the new chain, and the other tools you need, we can get started on the nitty gritty details. The first thing you’ll need to do, is to remove the front panel from the chainsaw.
Only one of the two sides of the chainsaw is removable, so this shouldn’t be too hard to find. Typically, it is sealed with one or two bolts (like in the photo). However, for chainsaws that have a “tool-less” chain tensioner, you would use the built-in tensioning crank to remove the panel.
Our chainsaw has bolts, so we’ll be showing you how to do it for that type of casing.
Now use your scrench to remove the 2 bolts.
There can be a lot of sawdust and other junk that gets crammed into all the gaps of your chainsaw. We’ll have an opportunity to clean a bit later, but let’s keep moving.
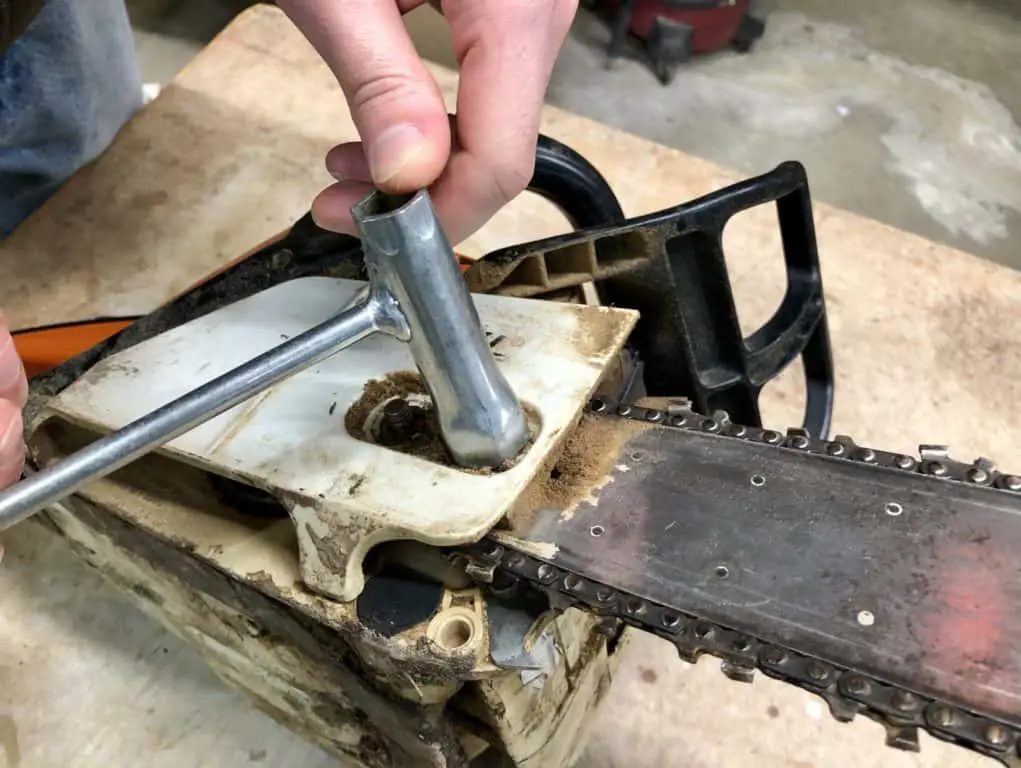
After you’ve removed all the bolts, simply lift the casing straight up and away from the chainsaw. See the photo below, and be amazed by my hand modeling.
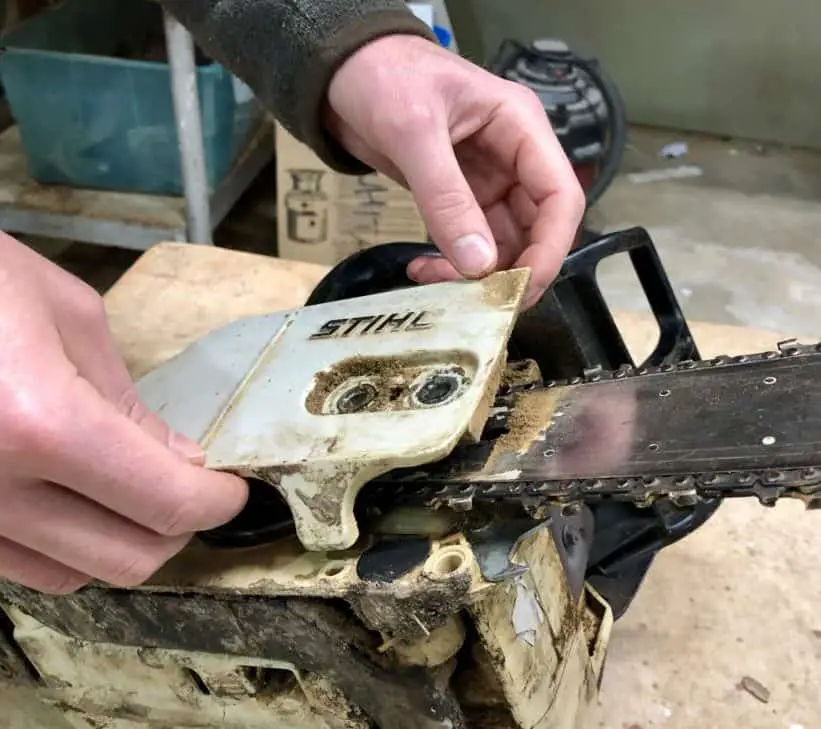
Alright, you did it. Now the front panel is off.
Looks pretty nasty, but this is a sign of progress!
4. Pull the bar off
Now that we’ve got the outer casing out of the way, we can take this thing apart.
At this point, there’s not much holding the bar in place. So all we have to do, is pull up to remove the bar and chain.

Once the chain lifts off of the sprocket (e.g. the base of the chainsaw), then you’ve got it.
From there, it becomes pretty easy to remove the chain.
5. Remove the old chain
Once the bar and chain, are both off of the chainsaw, remove the the chain from the bar.

There you go, piece of cake! You have successfully removed a chainsaw guide bar and chain, from the base of the machine.
Next up is some much needed cleaning.
6. Inspect and clean the bar
As you can imagine, the chainsaw bar can get pretty beat up. You are using it to grind through trees, after all.
Every time you change your chain, there’s a few things you should also do to maintain your guide bar.
Specifically, you’ll want to:
- Measure the track height
- Clean the bar track and oil hole
- Remove metal burrs
Let’s look at each one in a little more detail.
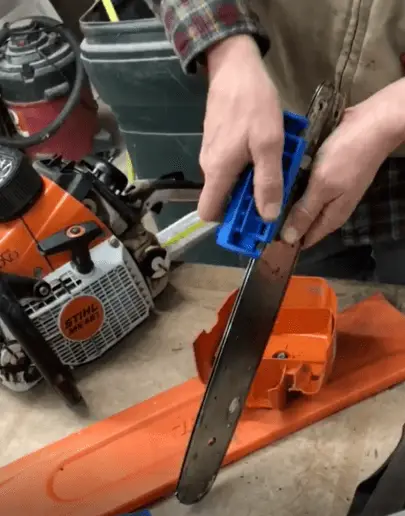
6.1 Check the bar track height
The track is the groove that the chain runs around. See here:
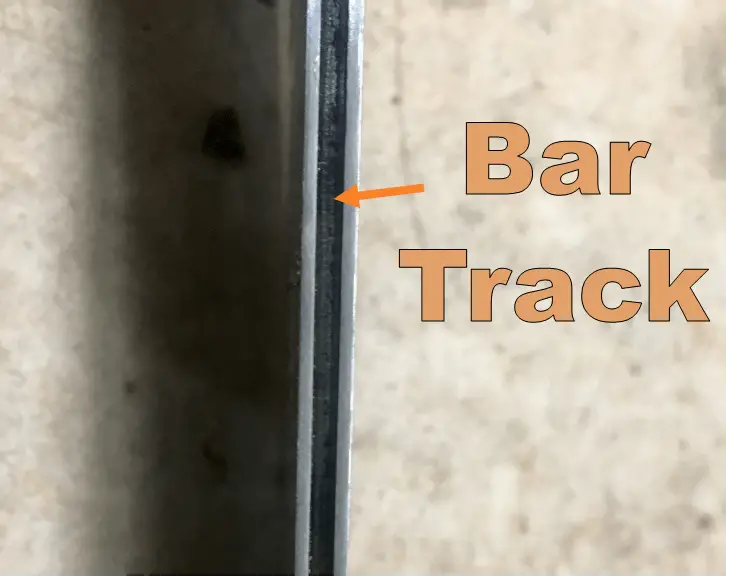
Over time, the friction of the chain, wears the sides of the track down.
Once you get below a certain height, you have to replace your bar.
Use your gauge tool, to check.
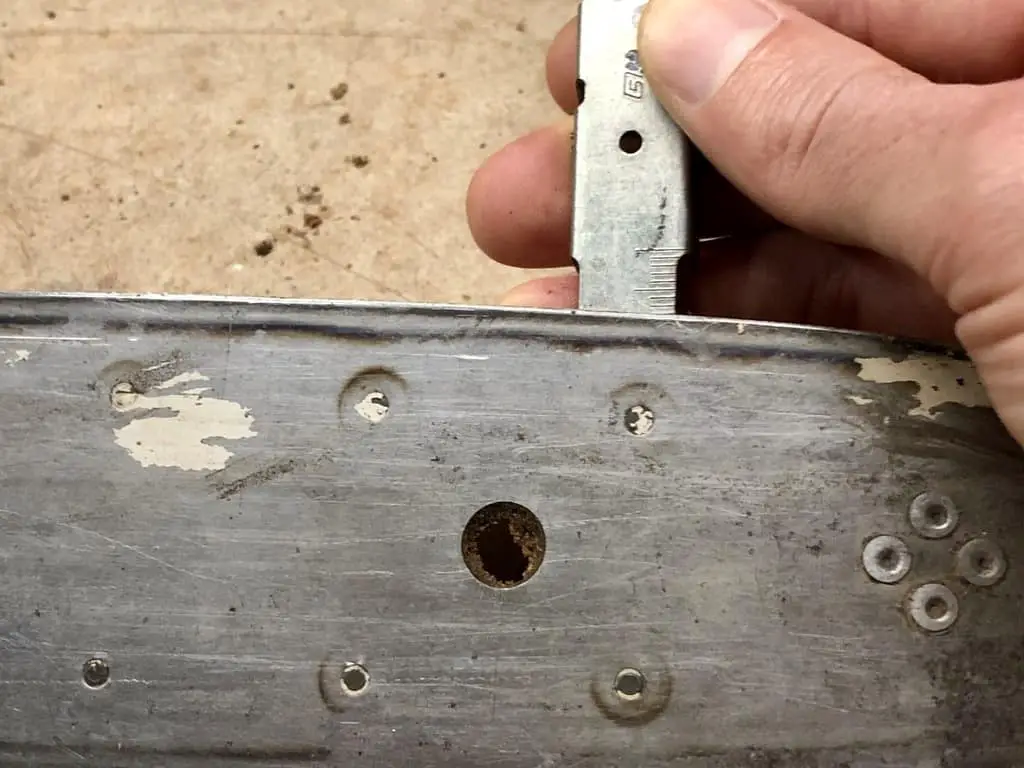
On the gauge tool there’s a notch near the curve of the tip. If the track is taller than that notch, you’re good to go.
Otherwise, your bar is too worn, and should be replaced.
Here, let me point at the notch I’m talking about:

See that long one there, that goes all the way to both ends of the metal? That’s your measuring mark. This is the rule-of-thumb I use though.
However, it is important to note, that depending on your bar manufacturer there might be more specific instructions on bar height. You’ll want to be aware of those, as it could affect your safety.
That’s something you could find in an owner’s manual, the company’s website, or by giving the manufacturer a call. If you’re like me, you’re probably not going to want to call a company on the phone, so I usually find this kind of information with a simple Google search.
6.2 Clean the bar track and oil hole
This part should be pretty easy, but is important nonetheless. The track gets oil, sawdust, and dirt caught in it.This causes friction which can eventually lead to overheating and long-term damage to your chainsaw.
Perhaps more importantly, you want to take out anything that could cause your chainsaw to throw it’s chain, which is a dangerous scenario that we all want to avoid. So, here’s what you do:
Take the gauge tool, and slide it along the track, to clean it out. Then, also clean the oil hole on both sides of the bar.
If you’ve been having trouble with your bar running dry even though the lubricant tank is full, a very common problem is for the oil hole to get clogged.
You may not have realized that there was an oil hole on your chainsaw bar. This is what “pulls” your bar and chain oil out of the tank, and onto the bar for lubrication. If you want to know more about bar and chain oil, including what it is and how to use it, check out this blog post.

6.3 Remove metal burrs
The last step in this section, is to file off metal burrs.
Metal burrs will form on the outside edges of the chainsaw bar over time. If you’ve never seen anything like this before, its basically just metal bumps on the outside of the bar.
These are pretty easy to remove when you catch them early. You can use pretty much any metal file, but our tool of choice is a ski tuning file.
Here’s how you do it. Hold the bottom of the bar in one hand, and scrape the file along the edge of the bar, pushing away from your body. You’ll want to hold the file level, so that it will create a flat edge. This is important for how the chain sits on the bar.
Once you’ve finished filing one side, flip it over and do the other side.
7. Clean around the sprocket
Okay, we’ve cleaned the bar out well. The next thing you should do, is clean out the sprocket.
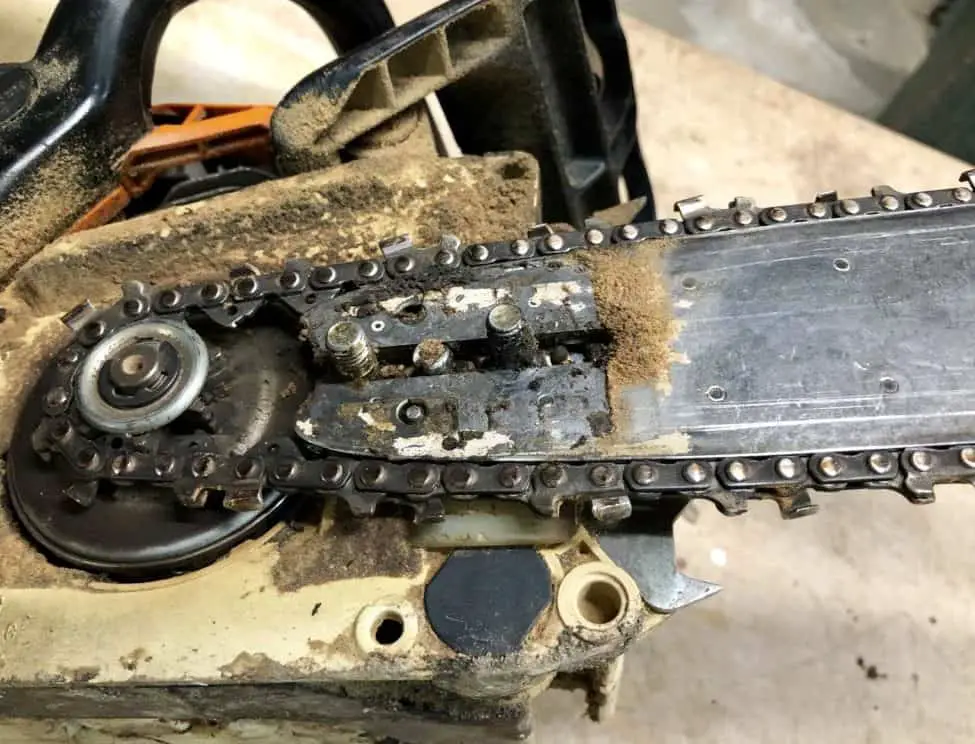
If you don’t know already, the sprocket is the metal cylinder in the center of the image below. On a chainsaw, the sprocket the mechanism that actually turns the chain using power from the engine.
To clean it, you can use your gauge tool, a rag, and/or an air compressor, to remove all the dirt, sawdust, oil, grime, etc.

Once you’re done with the sprocket, you’ve officially finished the cleaning portion of this process. Congrats! Next thing to do, is put all the pieces back together.
8. Re-assemble the bar and chain
The re-assembly process begins with the bar and chain. Take your new chain, and wrap it around your freshly cleaned guide bar.
the chain’s drive links (the shark-tooth looking side), go straight into the bar track. And of course, the sharp cutters go on the outside.
As a quick safety note, your new chain comes pre-sharpened, so you should be VERY careful how you handle it while putting your chainsaw back together. You may want to wear protective gloves while you do this, but at the very least, be mindful of where you are putting your fingers.

Now take your bar and chain together, and carefully attach them to the body of the chainsaw. The chain wraps around the sprocket, and the bar slides onto the small pegs that are just in front of the sprocket.

With the bar, chain, and sprocket all fitted together, you can go ahead and put the front panel back on the chainsaw.
9. Screw the panel back-on
You can re-attache the front panel in the same way you took it off, but obviously in reverse. I won’t go into too much detail here. Simply replace the side panel, and screw it back on with your scrench.
After this is done, we will be very close to square one (but not there quite yet).

10. Tighten the chain
If you’ve been following along with these steps, then it’s pretty likely that your chain is loose at this point. You’ll need to adjust this, before it’s safe to run your chainsaw.
You can adjust the tension of your chainsaw chain, using the screwdriver side of your scrench.
The tension screw for a chainsaw is typically in one of two places:
- On the side of the chainsaw next to the bolt that holds the casing (like in photo below)
- On the front of the chainsaw, directly on the side of the bar that faces the body of the chainsaw
If you’re not sure where the chain tensioning screw is, you can look around the outside of your chainsaw. You’ll usually be able to spot a small hole with a screw at the end. You can test whether it’s the right screw, by giving it a couple cranks with your scrench.
Alternatively, you should be able to find the location of your tension screw in your chainsaw’s owners manual. If you have found the correct screw, you should be able to see pretty clearly if the chain tension is changing.

11. Test Chain Tension
Once you have tightened your chain to the point that it looks close to the right level of tension, you can use a simple test to make sure you get it right.
Here’s an easy way to determine if your chainsaw chain is tight enough.
Pull out on the chain, as a test.
The drive links should NOT completely come free of the bar track.
This would be too loose:

The drive links should still pull out a little, but their ends should remain within the bar track.
This would be a good level of tension:

You also want to make sure that you aren’t making your chain too tight. A chain that is too tight can cause your chainsaw to overheat, and could even kill the engine. Even if it’s only a little too tight, this can impact the ease of your cutting.
You can tell if a chain is too tight, if it won’t pull out from the bar at all (or very little). You want it to be right in the sweet-spot, which is shown in the image above.
Also, keep in mind that as metal heats up, it expands. And when you run a chainsaw, it’s typically going to heat up the chain a bit. So, you’ll likely need to continue making adjustments to your chain tension periodically, and you can use this above test as you go.
If you want some more details, we have a full blog post on checking your chain tightness. This post includes more details, and another simple test you can use if you want to double check your chain.
Wrap-up
Alright, that’s it. You made it.
At this point, you should have a pretty good idea of how to replace your chainsaw chain. And since you read all the way to the end, you might have even finished the job. Way to go!
If Paul Bunyan and Bounty commercials have taught me anything, it’s that lumberjacks are awesome. Knowledge and practice is all that separates lumberjacks from the woefully ignorant.
Though sometimes intimidating (and dangerous), chainsaws are simple machines. With the right info, you could be on track to becoming a bonafide, chainsaw-toting lumberman or lumberwoman.
Who knows, you might even get a blue ox to follow you around. Okay, probably not, but I hope this article has demystified the process for sizing, selecting, and installing chainsaw chains.
If you have any unanswered questions, feel free to send me a note. And if you found anything in this article helpful, don’t be shy! Share it with a friend.
Now go do something awesome.
References
https://www.stihlusa.com/information/how-to-guides/saw-chain-identification/
https://www.sahanpuru.com/blog/howtoidentifyachainsawchain/