In order to understand chainsaw chains, you need to know about 3 things:
- Parts of a chainsaw chain
- Sizes of chainsaw chains
- Types of chainsaw chains
We’re going to cover each of these in detail, and by the end of this post you should know everything you need to know about chainsaw chains. Let’s get to it!
Chainsaw Chain Parts
A chainsaw chain is made up of 5 main parts. Each part has a specific purpose, and without any of the 5 components a chainsaw chain would not work (or completely fall apart!).
Here are the 5 parts:
- Cutter
- Guide
- Drive link
- Tie strap
- Rivet
Match the number above to the component in the picture below:
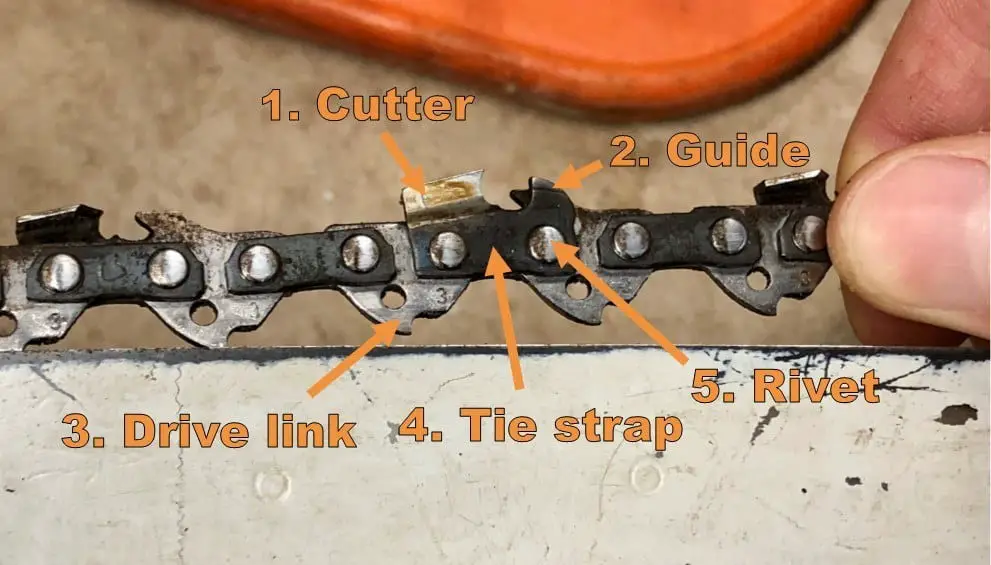
Each of these components have a different function, we’ll cover further details below.
1. Cutter
The cutter is the part of the chain that’s actually doing the cutting. I know, big surprise there.
Here’s what you may not know. A chainsaw chain cuts through a log, simply by chipping away at it. It’s not slicing clean through a tree in a straight line (like you would slice through a ham).
When the chain moves, the links flex, and they cut small rounded chunks from the wood. So, when you finish cutting through a thick log, you literally did it one chip at a time. Chainsaws are amazing.
The cutter type that you use will influence the shape, speed, and aggressiveness of a cut. The shape of the cutter is also a factor in the determining chain type. We’ll get into that more in the section about chainsaw chain types below.
But first, let’s talk about that little bump that comes before the cutter. It’s called the guide.
2. Guide
The guide is the small sloped metal piece that’s immediately in front of the cutter. The guide and the cutter are both a part of the same chain link. The guide itself isn’t doing any cutting. However, it’s an important control mechanism that impacts your chain’s cutting speed and safety.
The function of the guide, is to determine the depth of the cut. The depth determines how much wood is removed with each chip. In other words, the depth determines the “aggressiveness” of your cut.
The way the guide determines depth, is by controlling the amount of open space between the tip of the cutter, and the base of the chain. Basically, the guide is actually guiding the cutter into the wood, hence the name.
Next, we’ll look at drive links.
3. Drive Link
Drive links are the shark-tooth shaped links that are in the middle of every chainsaw chain. The rivets and tie straps of a chain (which we’ll cover next) fasten to both sides of the chain’s drive links.
If this isn’t clear for you, think of a chainsaw chain as a sandwhich. The bread on both sides are the tie straps, and the meat/cheese in the middle is the drive link.
The drive link has a simple, yet very important function. It keeps the chain attached and aligned with the chainsaw bar. Without drive links, a chain would not be able to stay on the chainsaw, which would make it impossible to do any meaningful work.
The drive links don’t require sharpening like the cutter and guide do. However, you should make a habit of cleaning out the bar groove. The bar groove (also called bar track) is where the drive links are inserted, and where they slide around the bar.
You can find details on how to clean and maintain a bar track, in our chain replacement guide in this post.
4. Tie Strap
The last two chain parts are the easiest to understand.
The tie strap is a small metal plate, that connects the links of the chain. Going back to my sandwich metaphor, if a chain was a sandwich the tie straps would be the bread. They are the thing that converts a bunch of unconnected drive links, into a connected chain.
As a note, notice that some tie straps are just connectors, while others have the cutters and guides on top. That’s all there is to it.
Now for the final piece of the puzzle….
5. Rivet
The last part of a complete chainsaw chain, are the rivets.
Rivets are small round metal pegs, which are hammered or pressed on the ends, in order to create a flat seal on both ends. Rivets are basically the nails that hold the other pieces of a chain together.
More specifically, the function of a rivet is to hold onto the tie-straps, and then the tie-straps connect the drive links. The rivets and tie-straps work together to hold the links of a chainsaw chain together.
By understanding the above chain components, you’re already well ahead of the curve. At this point, you probably know more about chains than most people buying chainsaws today.
All chainsaw chains have these 5 parts, however there are variations to them, and these variations determine the size and type of the chain. Let’s turn our attention to chain sizes next.
Chainsaw Chain Sizes
The size of a chain, is what determines whether it is compatible with your chainsaw. You could have the highest quality chain in the world, but if it doesn’t fit on your chainsaw, then you’re not going to get anywhere.
In order to determine the size of a chain, you use a combination of 3 numbers: link count, pitch, and gauge. All these measurements can be found on the chainsaw bar stamp or can be measured manually.
Here’s a description of each one:
1. Link Count
The length of chainsaw chains are not measured in inches or CM. Instead, chains are measured by the number of links.
For example, instead of saying a chain is 14 inches long, it would say something like “62 links”. If you have a chain already, it’s easy to determine the number of links just by counting them. As a note, you should count the drive links. You can ignore the cutters and other components.
If you don’t have a chain yet, you can find the size you need for your chainsaw, by looking at the information stamped on the bar of the chainsaw. See the example below.

If you know the name, and model of your chainsaw, you can also plug them into the Oregon Chain Selector.
It requires you to already have some information about your chainsaw, but will quickly narrow your search, and tell you which of their chains will fit your chainsaw.
2. Pitch
Pitch is calculated as the distance between 3 rivets, divided by 2. Basically, this is measuring the distance between your chain’s links. Since it’s a little more complicated to measure the pitch manually, I prefer to get it elsewhere.
There’s two ways to find chain pitch without doing the calculations. First, you can use the ID markings that are stamped into the chain links. You can learn where to find the chain markings, and also look up the corresponding pitch numbers using this post.
If you don’t have a chain yet, you can also find the chain you need, by referring to the information stamped on your chainsaw bar. See below:

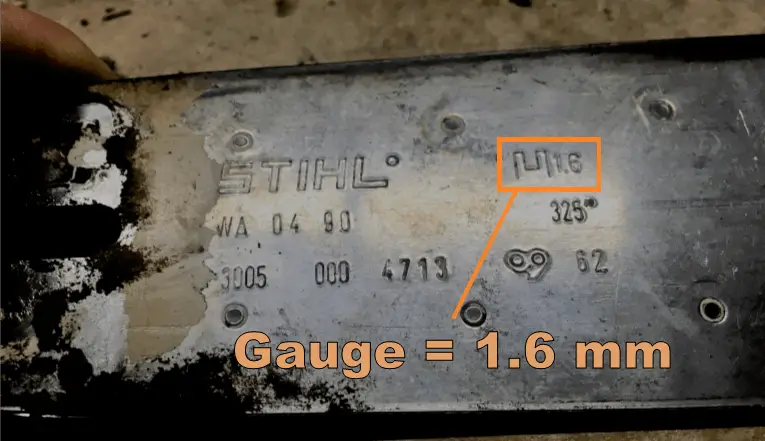
3. Gauge
Lastly, you need to know the gauge in order to determine the size of a chainsaw chain. Gauge is the measurement used to describe the width of a chainsaw chain’s drive links. The higher the gauge number, the wider the links.
If you’re not sure about the gauge rating on a chain, you can check it easily by measuring the width of the drive link. Getting the correct gauge is critical, because it determines if your chain’s drive links will fit into your chainsaw’s bar groove. You can learn more about chainsaw bars here.
Same as pitch and link count, you can also find the gauge you need for your chain, by looking at the information on the side of your chainsaw bar. See below:
If your chainsaw bar stamp is too worn to read the information, you can still get the size by manually measuring your chain or using numbers on the chain. This article has it broken down for you.
With these 3 numbers together (link count, pitch, gauge), you will now have the precise size for your chainsaw chain. Now that we’ve covered chain parts, and chain sizes, we’ll turn our attention to the different types of chainsaw chains.
Chainsaw Chain Types
The majority of the differences between types of chainsaw chains, all come from 3 specific chain variations:
- Cutter type (shape)
- Chain sequence
- Special additions
Below, we’ll explain each one in-detail. Let’s start with the cutter type.
1. Cutter Type (Shape)
Cutter type is also called the “shape” of the chain.
That’s because it represents the angle (or curve) of the chain’s cutter blades.
There are 3 shape types:
- Chipper
- Semi-chisel
- Chisel
The above types, are listed in order from most curved, to most square.
A chipper cutter resembles the curve of a question mark.
A semi-chisel is slightly more square than a chipper cutter.
A chisel cutter is the most square of the 3 cutter types.
The more square a chain’s cutters are, the more aggressive (i.e. deep), fast, and dangerous the chain is. A chisel chain cuts more quickly, and is more dangerous, compared to a semi-chisel or chipper chain.
Unless you’re a professional or very experienced, you’ll probably always want to use a chipper or semi-chisel chain.
2. Chain Sequence
Chain sequence, is essentially the spacing between the cutters on a chain.
Don’t get this confused with the pitch of the chain. This is an important distinction.
Pitch measures the distance between links, but not all links include a cutter. A chain’s sequence is the distance between the chain’s cutters.
There are 3 main options for sequence:
- Standard – alternates from left cutter to right cutter, with one drive link in between.
- Semi-skip – alternates between 1 and 2 drive links, separating cutters
- Skip – cutters are separated by 2 drive links in between.
Each of these are useful for different sized bars, and different purposes.
Here’s a table to give you a quick summary:
| Chain sequence | Use | Bar length |
|---|---|---|
| Standard | Most common configuration. Great for most applications, and is the default for most homeowner chainsaws. | 24″ or less |
| Semi-skip | For jobs where neither standard or skip are perfect. Semi-skip provides a step between a standard and skip chain. | 24″ to 32″ |
| Skip | Great for milling or ripping logs. Also can be helpful for longer bars, because it takes less engine power to run a saw with less cutters. | 32″ and up |
At the end of the day, you probably don’t need to worry about this too much. A standard chain sequence is going to work great, unless you’re doing some really advanced work.
3. Special Additions
In addition to the above, you can also get a chain with some special features. These are typically a variation to the chain’s material or organization, and are used to help with specific types of cutting.
As a note, if you’re a homeowner preparing to do small to mid-size jobs, you probably don’t need any of these special additions. If that’s you, feel free to skip this section.
Although there are several different additions you could get, here are a few popular examples:
- Carbide tipped: a carbide tipped chain is much more durable, and doesn’t need to be sharpened as frequently. However, they are also expensive, and require a special tool for sharpening. A carbide tipped chain, is probably only worth it if you’re going to be doing particularly abrasive cutting. Like sawing metal, rescue work, or really rough storm clean-up.
- Semi-skip: We talked about semi-skip and skip in the chain sequence section. This is considered a special addition by some chain manufacturers, like Stihl.
- Skip (or full-skip): Chains with a skip chain sequence (also called full-skip), are considered a special addition by some chain manufacturers, like Stihl.
There’s a few other things out there, but you’re probably not going to need to pay any attention to them. When in doubt, just skip the special additions. If you don’t know you need them, then you probably don’t.
Wrap-up
That brings us to the end of our info on chainsaw chain parts, sizes and types. We did it!
I hope this post has answered your chain-related questions, and helped you to understand chainsaw chains more clearly. If it was helpful, then please share it with a friend or on social media.
If you want to know the different components of chainsaw, check out our article on chainsaw parts.
We love reaching new people with the blog, and whenever a reader decides to share our stuff, it helps motivate us to create even more helpful content.
If you have any unanswered questions, we’d love to help. Check-out the blog page, where we are regularly posting answers to other questions related to chainsaws, wood heating, and more.
Thanks for reading, and now go do something awesome.