The numbers stamped on your chainsaw chain have a meaning. There’s a lot of confusion about what chainsaw chain markings are for, and in this post we’re going to help you clear things up.
First, we’ll answer what the numbers are for generally, and then we’ll get into specific definitions from some of the most popular chain brands.
So, what do the numbers on a chainsaw chain mean?
The numbers stamped on a chainsaw chain are an ID code used by the manufacturer to indicate the pitch and gauge measurements of the chain. Pitch and gauge are important dimensions which influence whether or not a chain is compatible with a chainsaw.
That’s the general answer, but we can get much more specific. Below, we’ve included two charts that show the values for leading chain brands, and we’ll also further define pitch and gauge.
Chain Markings (Oregon, Husqvarna, Carlton)
In this section, there is a chart that shows the gauge and pitch ratings that correspond to chain markings used by 3 of the most popular chain brands: Oregon, Husqvarna, and Carlton. If you have a Stihl chain, check the second table below. Stihl uses a combination of 2 chain numbers.
Both of these tables contain data that was originally posted by Sahanpuru, and we’ve reformatted things to make it a bit easier to read. The tables are sortable, so feel free to use that feature to find your chain. Using the “CTRL + F” search box is also a good way to search this page.
| Chain Marking | Brand | Gauge | Pitch |
|---|---|---|---|
| A1 | Carlton | .050″ | 3/8″ |
| A2 | Carlton | .058″ | 3/8″ |
| A3 | Carlton | .063″ | 3/8″ |
| B1 | Carlton | .050″ | .404″ |
| B2 | Carlton | .058″ | .404″ |
| B3 | Carlton | .063″ | .404″ |
| E1 | Carlton | .050″ | 1/4″ |
| K1 | Carlton | .050″ | .325″ |
| K2 | Carlton | .058″ | .325″ |
| K3 | Carlton | .063″ | .325″ |
| N1C | Carlton | .050″ | 3/8″ Low Profile |
| N4 | Carlton | .043″ | 3/8″ Low Profile |
| H21 | Husqvarna | .058″ | .325″ |
| H22 | Husqvarna | .050″ | .325″ |
| H23 | Husqvarna | .050″ | .325″ |
| H25 | Husqvarna | .058″ | .325″ |
| H26 | Husqvarna | .063″ | .325″ |
| H30 | Husqvarna | .050″ | .325″ |
| H35 | Husqvarna | .050″ | 3/8″ Low Profile |
| H36 | Husqvarna | .050″ | 3/8″ Low Profile |
| H42 | Husqvarna | .058″ | 3/8″ |
| H45 | Husqvarna | .063″ | 3/8″ |
| H46 | Husqvarna | .063″ | 3/8″ |
| H47 | Husqvarna | .063″ | 3/8″ |
| H57 | Husqvarna | .063″ | .404″ |
| H58 | Husqvarna | .058″ | 3/8″ |
| H64 | Husqvarna | .063″ | .404″ |
| H80 | Husqvarna | .050″ | 3/8″ |
| H82 | Husqvarna | .050″ | 3/8″ |
| H83 | Husqvarna | .050″ | 3/8″ Low Profile |
| 16 | Oregon | .063″ | .404″ |
| 18 | Oregon | .080″ | .404″ |
| 20 | Oregon | .050″ | .325″ |
| 22 | Oregon | .063″ | .325″ |
| 25 | Oregon | .050″ | 1/4″ |
| 26 | Oregon | .058″ | .404″ |
| 27 | Oregon | .063″ | .404″ |
| 28 | Oregon | .050″ | .404″ |
| 33 | Oregon | .050″ | .325″ |
| 34 | Oregon | .058″ | .325″ |
| 35 | Oregon | .063″ | .325″ |
| 50 | Oregon | .050″ | .404″ |
| 51 | Oregon | .058″ | .404″ |
| 52 | Oregon | .063″ | .404″ |
| 58 | Oregon | .058″ | .404″ |
| 59 | Oregon | .063″ | .404″ |
| 68 | Oregon | .063″ | .404″ |
| 72 | Oregon | .050″ | 3/8″ |
| 73 | Oregon | .058″ | 3/8″ |
| 75 | Oregon | .063″ | 3/8″ |
| 90 | Oregon | .043″ | 3/8″ Low Profile |
| 91 | Oregon | .050″ | 3/8″ Low Profile |
Chain Markings (Stihl)
Okay, if you have a Stihl chain, you’ll want to use the below table. Stihl uses a slightly different approach for their chain numbers compared to the other manufacturers above.
Instead of using a single chain marking, Stihl uses a combination of 2 numbers. One of these numbers is stamped into the drive link (just like the other manufacturers), and Stihl stamps an additional number into the tooth link.
For more information on where chain markings are stamped, jump to this section below. Now here’s the table details for Stihl chain numbers:
| Drive Link Marking | Tooth Link Marking | Brand | Gauge | Pitch |
|---|---|---|---|---|
| 1 | 1 | Stihl | .043″ | 1/4″ |
| 1 | 3 | Stihl | .050″ | 1/4″ |
| 3 | 2 | Stihl | .050″ | .325″ |
| 5 | 2 | Stihl | .058″ | .325″ |
| 6 | 2 | Stihl | .063″ | .325″ |
| 3 | 3 | Stihl | .050″ | 3/8″ |
| 5 | 3 | Stihl | .058″ | 3/8″ |
| 6 | 3 | Stihl | .063″ | 3/8″ |
| 1 | 6 | Stihl | .043″ | 3/8″ Low Profile |
| 3 | 6 | Stihl | .050″ | 3/8″ Low Profile |
| 3 | 4 | Stihl | .050″ | .404″ |
| 5 | 4 | Stihl | .058″ | .404″ |
| 6 | 4 | Stihl | .063″ | .404″ |
Where to Find Chain Markings
If your head is spinning from all the numbers, and you don’t know where to find these chain markings yet, don’t worry. We’ve got you covered. The exact location can vary slightly depending on the manufacturer, but generally it’s going to be on the drive link.
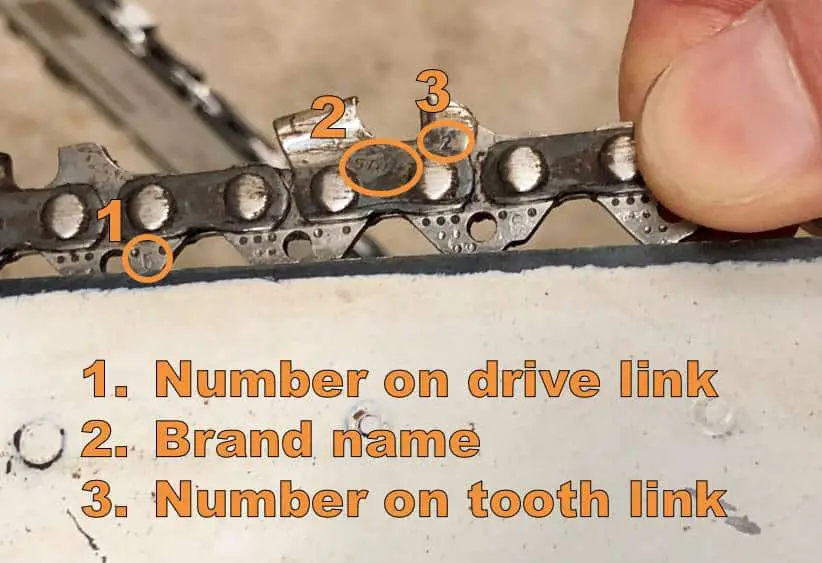
And for Stihl chain’s, these markings show up on both the drive links and tooth links of a chain. Check-out the image below to see an example:

This chain is well used, so it’s a little tough to read the stamped text. However, you should be able to see the following:
- The number “6” on the drive link
- The “Stihl” brand name on the tooth link
- The number “2” on the tooth link
As you can see, this is a Stihl chain, which makes for a great example because you can see where the marking is on the drive link and on the tooth link.
Most manufacturers will have a number on the drive link and the brand name (items 1 and 2 above). Stihl is the exception, because they also use a number on the tooth link (item 3 above).
Using the chain numbers from this example, we can refer to our table of values, and learn that this chain has the following gauge and pitch:
- Gauge = .063″
- Pitch = .325″
If you can’t find the chain numbers or are having trouble reading them, there are two other ways you can measure your chain. We have those described in our other article here.
In the next section, we’ll define exactly what these numbers mean. We’ll also cover drive link count, which is another important measure you’ll need to know for your chain.
What is Gauge and Pitch?
1. Gauge
Gauge is the measurement used to describe the width of a chainsaw chain’s drive links. The higher the gauge, the wider the links. It’s helpful to know this, because if you’re not sure about the gauge rating on a chain, you can check it easily by measuring the width of the drive link.
When you’re choosing a chainsaw chain, getting the correct gauge is critical, because that will determine if you have a proper fit with your chainsaw’s bar groove. See below:
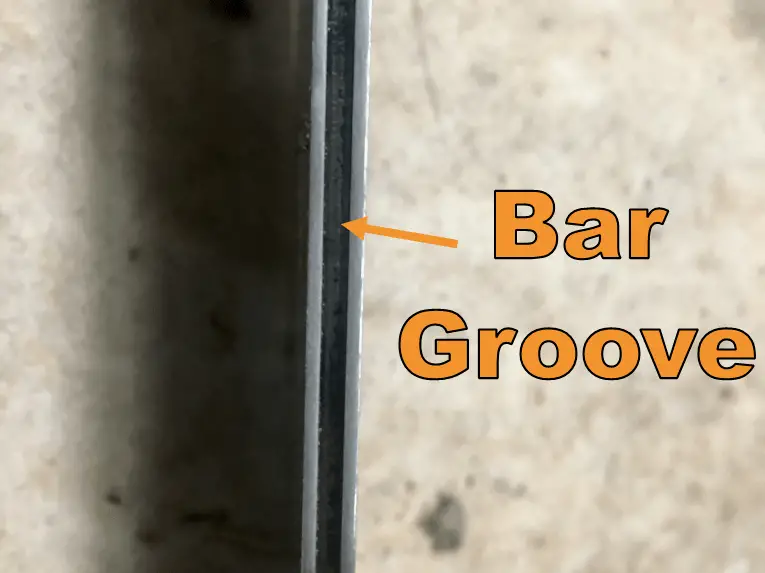
A chain’s drive links are the part of the chain that slide around the bar groove, allowing the chain to cling to the body of the chainsaw. If your chain’s drive links have the wrong gauge, they will either be too big or too small for the bar groove.
When the gauge is too small, you run the risk of throwing your chain, which can be quite dangerous. You would also have a hard time keeping the chain in place, and may not be able to finish a cut at all. When the gauge is too big, it won’t fit into the bar groove in the first place.
For a chain to be compatible with your chainsaw, it has to match the gauge rating of your chainsaw’s bar. You can learn the 4 measurements relevant to a chainsaw bar in this post.
2. Pitch
Technically speaking, the pitch is calculated as the distance between 3 rivets, divided by 2. In essence, this is a measure of the distance between your chain’s links. Since it’s a little more complicated to measure the pitch manually, I prefer to get it elsewhere.
You can find the chain pitch using the chain markings and our tables above. It’s also typically printed on the packaging (for new chains) so sometimes you can get it there.
When looking for compatible chains, you can find the pitch you need for your chainsaw, by looking at a the information stamped on the side of the chainsaw bar. If you’re not sure where to look for that, you can learn all about it in our post about chainsaw bar measurements.
3. Drive Link Count
In order to have the complete set of chain measurements, you’re also going to need one other piece of information: how long the chain should be. The length of chainsaw chains are not measured in inches or CM. Instead, chains are measured by the number of links.
For example, instead of saying a chain is 14 inches long, it would say something like “60 links”. If you have a chain already, it’s easy to determine the number of links, just count them! This goes by drive links, by the way, so make sure those are the links you’re counting.
Similar to gauge and pitch, the number of links will also influence whether the chain is compatible with your chainsaw. You can find the link count that is compatible with your chainsaw, stamped into the side of the chainsaw bar.
How to Change a Chainsaw Chain
Once you’ve identified your chain, you may be ready to install it on your chainsaw. We’ve written an in-depth article on how to replace a chainsaw chain, check it out to learn the steps. For now, here’s a brief summary of what you’ll need to do next:
- Grab a scrench and a gauge tool
- Remove the front panel
- Pull the bar off
- Remove the old chain (if there is one)
- Inspect and clean the bar
- Clean around the sprocket
- Re-assemble the bar and chain
- Screw the panel back on
- Tighten the chain
- Test chain tension
If you’ve changed a chain before, then this could be a helpful checklist. If it’ll be your first time changing a chain, go ahead and jump to our in-depth guide, which includes step-by-step photos that will make things much easier for you to follow.
Wrap-up
There you have it. We’ve covered the numbers on chainsaw chains, what they mean, where to find them, and more.
I hope that you’ve found the answer you were looking for, and if you did find this post helpful, please share it with a friend or on social media. We’re always excited to help more people, and to get the word out about BurlyBeaver.com.
I hope you have a marvelous day (or evening), and we’ll see you next time.
Now go do something awesome!